
Step-by-Step Guide to Planning Your Home Design
Here is something most homeowners discover the hard way: buying beautiful things does not automatically create a beautiful home. A well-chosen sofa in the wrong room, a stunning light fixture at the wrong scale, a color palette picked room by room with no overarching logic, these are the small decisions that quietly unravel a space.
What separates a home that feels intentional from one that simply feels furnished is planning. Specifically, it is the kind of thoughtful interior space planning that connects every decision, furniture, light, material, and color into a single coherent vision before a single item is purchased.
This guide walks through the entire process step by step, from clarifying what you actually want to selecting the finishes that bring it all together. Whether you are approaching a single room or an entire home, the framework is the same. Each step builds on the one before it, and skipping any of them is where most projects quietly go off course.
Step 1: Define What You Actually Want From the Space
The most useful question you can ask at the start of any residential interior planning project is not “What style do I like?” but “How do I want to feel in this room?” The distinction shapes everything that follows.
Aesthetic preferences are easy to accumulate; most people have years of saved images and half-formed ideas. What is harder, and far more valuable, is translating those preferences into clear functional and emotional goals. A room can look exactly like your inspiration image and still feel completely wrong if the proportions are off, the light is wrong, or the layout does not match how you actually move through the space.
Before anything else, consider:
- How the room is currently used versus how you genuinely want to use it
- Which qualities matter most: warmth, calm, energy, openness, coziness
- What your absolute non-negotiables are: natural light, a dedicated work area, storage, ease of movement
- Which aesthetic directions feel genuinely like you, versus what is simply trending
A mood board is one of the most practical tools for this stage. Collect images from design publications, real project portfolios, or simply places and spaces that have made you feel at ease, and look for patterns.
Recurring preferences for warm tones, clean lines, natural textures, or layered light are not coincidences. They are your design language, and naming them early saves considerable time and money later.
This first step is not about making final decisions. It is about reaching enough clarity that every subsequent decision has a reference point.
Step 2: Understand Your Space Before You Design It
Once your vision is clear, the next step is to understand the physical reality of the space you are working with. Thoughtful living space design is always grounded in accurate, detailed knowledge of the room, not assumptions about it.
Start with a full set of measurements: wall lengths, ceiling heights, window and door placements, and any architectural features that will stay, such as alcoves, columns, built-ins, and exposed beams. These numbers determine furniture scale, spatial flow, and what is physically possible within the room.
From there, observe how natural light behaves throughout the day. Light is one of the most powerful forces in any interior; it shifts color, alters mood, and changes the perceived size of a room hour by hour. A material or paint color that reads beautifully in a south-facing space can feel entirely different in a north-facing one.
Beyond light and dimensions, pay attention to:
- How people naturally move through the room, where traffic flows, and where it congests
- The room’s existing focal points, a fireplace, a view, and a ceiling detail, are worth emphasizing
- Structural elements that are fixed and need to be designed around rather than against
A useful approach from practice: In a Beverly Hills living room project, early site observation revealed that the room’s northern orientation was flattening the planned warm-neutral palette.
Rather than switch the color direction entirely, large-format reflective porcelain was specified for both the floor and a feature wall, surfaces that bounced available light back into the room and restored the warmth the design required. Identifying this early, during the assessment phase, prevented a costly material change mid-project.
This step is worth taking slowly. Designers spend considerably more time analyzing a space than most homeowners expect, because what you find here shapes every material, furniture, and lighting choice that comes after it.
Step 3: Build a Realistic, Structured Budget
A clearly defined budget is not a limitation on good household interior design; it is a tool for making better decisions. Without one, every choice exists in a vacuum, and it becomes easy to overspend on some elements while underfunding others that matter more.
Break the budget into distinct categories early:
- Furniture and soft furnishings: seating, rugs, curtains, bedding, cushions
- Lighting: ambient overhead fixtures, task lighting, accent, and decorative pieces
- Surfaces and finishes: flooring, wall treatments, ceiling details
- Decorative objects: art, and accessories
- Professional fees: if working with a designer or project coordinator
A practical rule: direct the largest portion of the budget toward high-use, high-visibility elements. Seating, flooring, and lighting are experienced daily and define the room more than any accessory or decorative layer. Saving on these and spending on accessories is one of the most common budget mistakes in interior design.
It is also worth accounting for contingency, typically 10 to 15 percent of the total, for unexpected lead times, substitutions, or design refinements that emerge once a space starts coming together.
Step 4: Establish Your Design Style and Color Direction
With a clear vision and a structured budget in place, the next stage of contemporary living space design involves committing to a coherent style direction and building a color palette that will carry through the entire scheme.
Choosing a Style Direction
Some of the most enduring interior styles for residential spaces include:
- Modern and contemporary: disciplined lines, restrained palettes, deliberate material choices
- Transitional: a careful blend of traditional warmth and modern clarity
- Coastal or California casual: natural textures, relaxed atmosphere, honest materials
- Warm minimalism: reduced form with rich, tactile surfaces and careful layering
- Maximalist: layered pattern, bold color, and a collected, curated sense of abundance
Committing to one direction does not mean rigidly excluding everything else. In practice, the most successful interiors blend two complementary aesthetics; they simply do so with intention. The key is that every element serves the same emotional goal.
Building the Color Palette
A well-constructed color palette for elegant home styling typically works in three tiers:
- A dominant neutral: walls, large upholstered pieces, major cabinetry
- One or two mid-tones: rugs, drapery, secondary furniture
- One or two accent colors: art, cushions, statement accessories
Test paint colors in the actual room, at multiple times of day, before committing. Swatches in a store are a starting point; the room itself is the only reliable test.
Completed project portfolios are a useful reference at this stage, particularly for seeing how color relationships behave across different surfaces and at full scale. The kitchen design portfolio and bathroom design portfolio at Karamia Designs show how these decisions translate from concept to finished space.
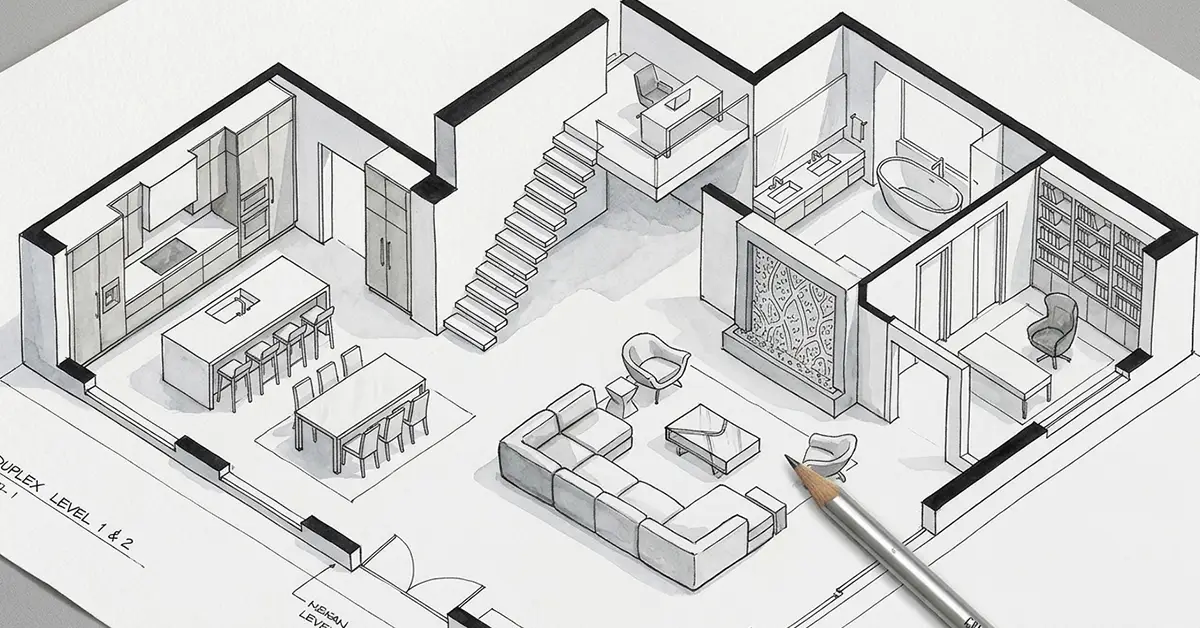
Step 5: Work Out the Furniture Layout
Furniture placement is the structural backbone of any room, and it is where residential interior planning becomes most practical. Even the most carefully chosen pieces will fail to perform if their arrangement does not account for how the room is actually used.
Using your measurements, create a scaled floor plan. A hand-drawn sketch is sufficient at this stage. Work through the arrangement with these principles in mind:
- Position furniture to encourage natural conversation and ease of movement
- Maintain a minimum of 36 inches of clear walkway in primary traffic areas
- Vary the visual weight across the room, balance larger pieces with lighter forms
- Anchor seating arrangements with a rug that is large enough to ground the grouping
The most common furniture mistake in home design is placing every piece against the perimeter walls. This creates a disconnected, waiting-room quality that no amount of styling can fully resolve. Floating seating inward, even a few inches, changes the atmosphere of a room immediately.
For rooms where storage is a design challenge in itself, thoughtful planning of fitted and freestanding solutions is worth addressing at this stage rather than adding it as an afterthought. The closet design services section covers how storage can be integrated without visually dominating a space.
Step 6: Choose Materials, Finishes, and Lighting
This stage is where creative home environment planning moves from decisions on paper into physical, touchable reality. The materials and finishes you select determine the tactile experience of the home, how surfaces read in different light, how they age, and how they relate to one another.
Thinking About Materials
The most effective approach is to think in terms of material relationships rather than individual selections in isolation. Warm-toned timber reads differently against polished stone than it does against a matte plaster wall. Natural fiber softens a hard-edged, tile-heavy room. Gloss and matte surfaces in the same palette create depth without adding color.
- Flooring: hardwood, engineered timber, large-format porcelain tile, natural stone
- Counters and feature surfaces: quartz, marble, quartzite, Dekton, honed concrete
- Walls: limewash plaster, architectural timber paneling, quality wallpaper, specialist paint techniques
A note on material specification: For a coastal Malibu project, Dekton was chosen for the master bathroom, not primarily for its appearance, though it suited the space, but for its resistance to salt air, humidity, and UV exposure. Material decisions at this level account for how a surface will perform over a decade, not just how it photographs on the day of completion.
Layering the Lighting
Lighting is consistently the most underestimated element in interior design, and it is the one that most homeowners address too late in the process. Electrical infrastructure needs to be planned before walls are finished; retrofitting a lighting layout is expensive and disruptive.
A well-designed lighting plan works across three layers:
- Ambient: the primary light source for the room; overhead fixtures, recessed lighting, pendants
- Task: directional light for specific activities; under-cabinet strips, reading lamps, desk fixtures
- Accent light used to create atmosphere: picture lights, decorative sconces, and LED cove lighting
Install dimmers throughout. The ability to shift from bright functional light to warm ambient light changes how a room feels entirely, and the cost is negligible relative to the quality-of-life benefit.
Step 7: Know When to Bring in Professional Support
Many homeowners approach the early stages of home design independently, and there is real value in doing so. Developing your own vision, understanding the space, and building a budget all make you a clearer, more effective client if and when you bring in professional help.
That said, there is a consistent gap between spaces that are well put together and spaces that feel genuinely exceptional, and professional experience accounts for much of it. A skilled interior designer brings spatial intuition developed across hundreds of projects, access to materials and suppliers not available through retail channels, established relationships with reliable tradespeople, and the objective distance to see a room’s potential without the emotional attachment that makes self-directed projects harder to edit.
The practical benefits are also financial. Avoiding even one significant material or furniture mistake, the wrong sofa scale, a tile that does not work once it is laid across an entire floor, a lighting plan that requires retrofitting, can easily offset the cost of professional fees.
Whether you engage a designer for the full process or bring one in to review a specific stage, the interior design services and kitchen and bathroom design pages cover what different levels of professional involvement typically include.
Frequently Asked Questions
What is the first step in planning a home design?
Define how you want the space to feel and function before making any aesthetic decisions. Clarity of purpose is the foundation on which everything else is built.
How long does the interior design planning process take?
The planning and concept phase typically runs two to six weeks, depending on the scope of the project and how quickly design decisions can be confirmed.
Do I need a professional designer, or can I do it myself?
You can manage the early stages independently; vision, budget, and layout research all benefit from personal input. Professional support becomes most valuable during material specification, spatial planning, and project coordination.
What is the single most important element in interior space planning?
Furniture layout and traffic flow. A room that moves well and is arranged with proportion in mind will feel right even before the finishing layers are added.
How much should I budget for living room design?
A mid-range living room typically starts around $5,000 to $15,000 for furnishings and lighting alone. Higher-specification projects with custom pieces and specialist materials can exceed $30,000 to $50,000.
Which design styles work best for Los Angeles homes?
Coastal modern, warm minimalism, and transitional design are consistently well-suited to the LA climate and lifestyle; all share an emphasis on natural light, indoor-outdoor connection, and materials that age well in warm, sunny conditions.
When should lighting be considered in the design process?
From the beginning. Lighting affects electrical infrastructure, material selection, and spatial arrangement. Leaving it until the final stages is one of the most common and costly mistakes in residential design.
Final Thoughts
Good interior design is not decorating. It is a sequence of connected, deliberate decisions, each one informed by the one before it and building toward a home that genuinely reflects how you live.
The homeowners who are happiest with their finished spaces are rarely the ones who spent the most. They are the ones who planned the most carefully, who started with a clear vision, understood their space before committing to it, structured their investment with intention, and made choices that added up to something coherent.
If you are ready to start that process with professional guidance, the team at Karamia Designs offers consultations for projects across Los Angeles. You can also explore completed design projects in the portfolio to see how these principles work in practice across different spaces, styles, and budgets. When you’re ready to take the next step, book a consultation here.